‘Did You Know’ Episode 9 – Environmental Conditions Before, During and After the Installation

Posted on

Episode 9 – Environmental Conditions, Before, During and After the Installation

There are many factors that can play into the performance of a hardwood floor. None is more important than how moisture can affect flooring. Hardwood flooring professional know that wood is a natural material and can absorb and release moisture depending on the surrounding environmental conditions. Checking or possibly monitoring these conditions should start even before the wood is delivered to the jobsite.

If you have ever been to a NWFA Installation course, you would hear a decent amount of information and conversation regarding moisture and wood. How to test and document moisture on the jobsite and depending on conditions, when to install or not to install the flooring. As a matter of fact, the NWFA has a separate publication covering just this topic, “Moisture and Wood”, which can be an additional resource if you would like to understand more about how moisture can affect wood flooring.

For this article, we are going to cover controlling and maintaining the environmental conditions of the jobsite to minimize moisture related issues. As mentioned above, this starts BEFORE the flooring is delivered to the jobsite. For instance, your builder calls you and states ‘the job is ready for installation of the wood flooring’. In their mind, the schedule is conducive for the installation. A jobsite evaluation should be done at this time for any issues. While you may already be doing a pre delivery jobsite evaluation, here are a few items to make sure you are checking and verifying prior to the delivery of flooring:

  1. Is the jobsite complete to the required stage of construction?
    • All roofing, flashing and gutters are complete
    • All windows and doors are installed
    • HVAC is up and running and set to maintain the manufacturer or NWFA installation guidelines
    • Crawl space (if applicable) is properly encapsulated with no moisture present
  2. Has the exterior grading been done to allow for moisture to shed away from the building?
    • While final landscaping may not be completely necessary, a completed rough grade will help minimize water pooling up against the building’s foundation and finding it’s way into the building.
  3. Has all ‘Wet Work’ been completed?
    • All drywall and major painting have been competed
    • The tile contractor has completed all installation and grouting
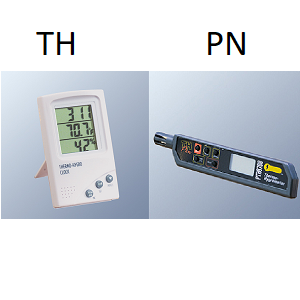
  4. After the above items have been checked, measure and document the moisture content of the subfloor or the concrete substrate in addition to taking the temperature/humidity of the jobsite.
    • If your readings are too high, your flooring will absorb that moisture. Moisture content of the subfloor should be no more than 2-4% higher of the expected wood equilibrium moisture content or EMC (depending on width of flooring).

Here is a common phrase used in many installation courses regarding moisture…

“Get the jobsite ready for wood; then get the wood ready for the jobsite”.

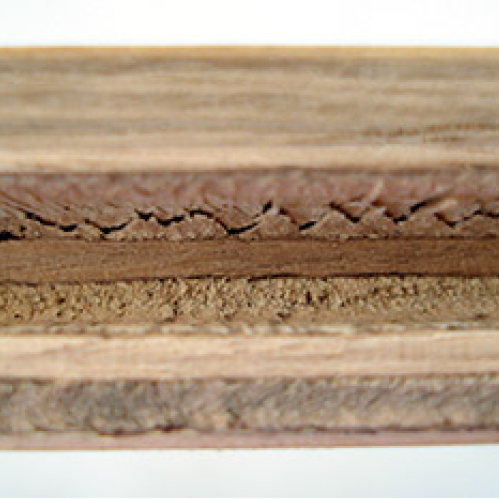
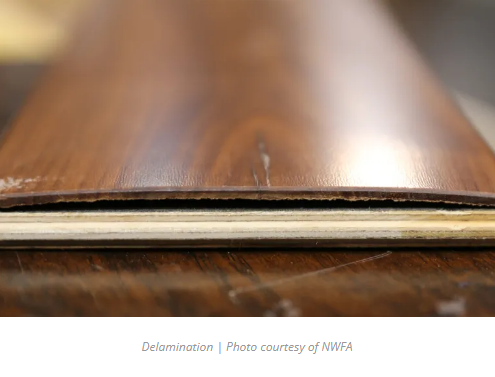
What this means is do the above-mentioned checks and balances prior to scheduling the delivery of the wood. If the jobsite is not ready, your flooring will acclimate to these conditions and not the living conditions the flooring will be exposed to once the owner takes possession. This will cause an awkward conversation a few months down the road when that flooring does officially acclimate in place possibly causing cracking/popping, unsightly gaping and/or irreparable damage.

You have taken the time to check the jobsite conditions of your upcoming job prior to having the wood delivered. All exterior doors and windows have been installed and all ‘wet work’ has been completed. HVAC is up and running and the subfloor readings are within NWFA installation guidelines. Now you can have the flooring delivered and start installing the flooring, correct?  

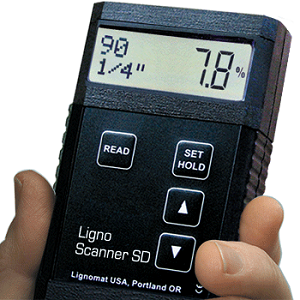
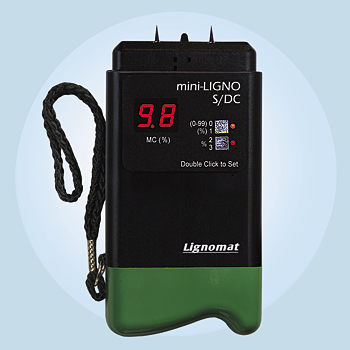
One more thing to do before the installation can begin, acclimation. The acclimation processes may vary depending on whether you are installing a prefinished or unfinished material. It can also vary depending on if it is solid or engineered. Check the installation guidelines of the material you are using to properly acclimate their flooring. Make sure the building owner is maintaining the living conditions DURING the acclimation. Take moisture readings using a moisture meter throughout the acclimation process. Document these numbers and the temperature and RH readings using a thermohydrometer. In any situation, there should be no more than a 4% difference between a wooden subfloor and the flooring. If the flooring is to be glued over a concrete slab, consult your adhesive manufacturer for their testing recommendations and guidelines.

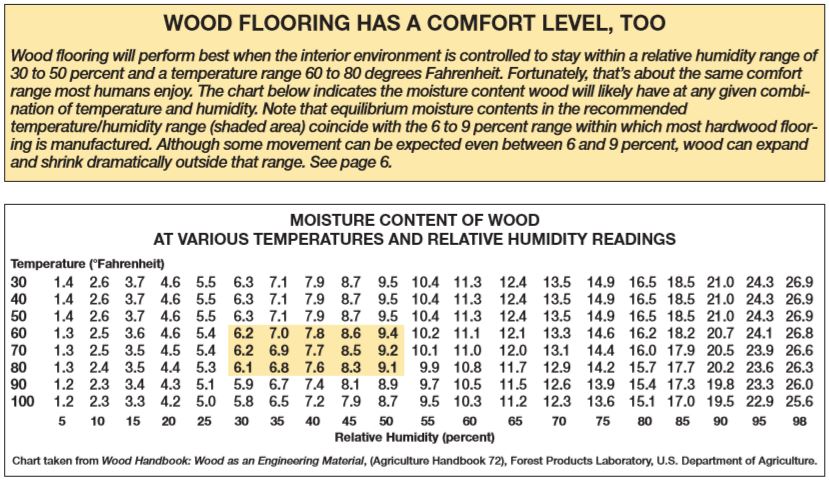
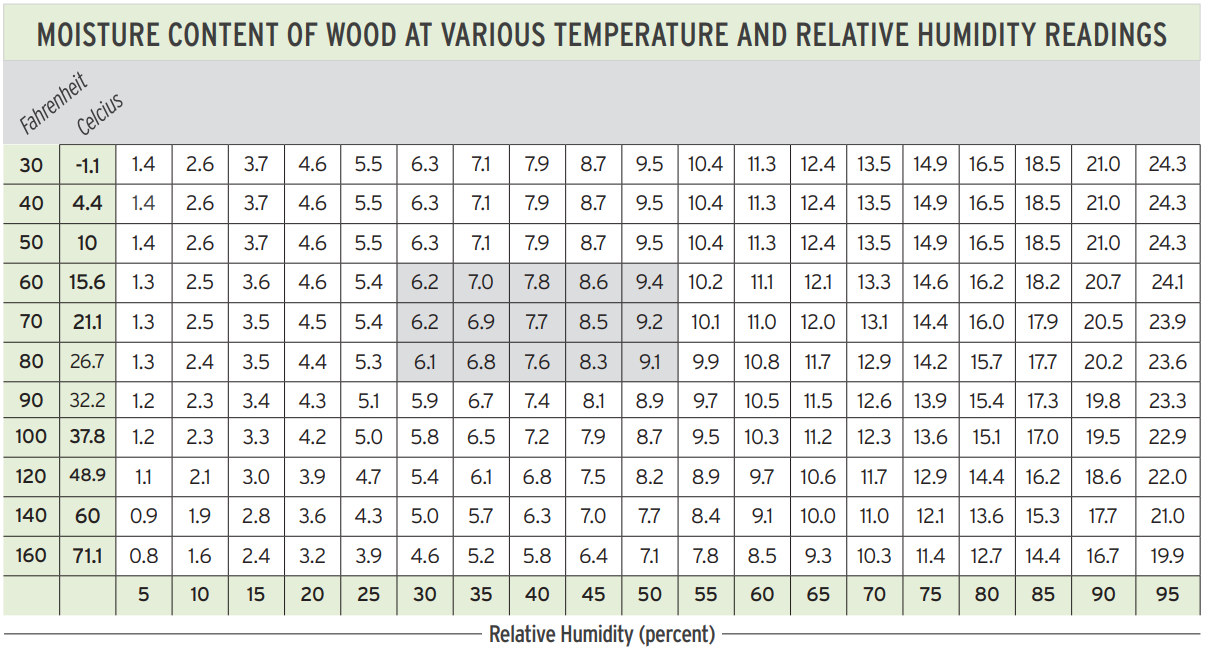
If you are not familiar with the acclimation process, dimensional stability and change coefficient of each wood species or figuring out the equilibrium moisture content of your area, the NWFA’s ‘Moisture and Wood” publication goes into great depth regarding these and many more items regarding moisture and wood. This moisture content graph below is commonly used while explaining the effects of moisture in wood.

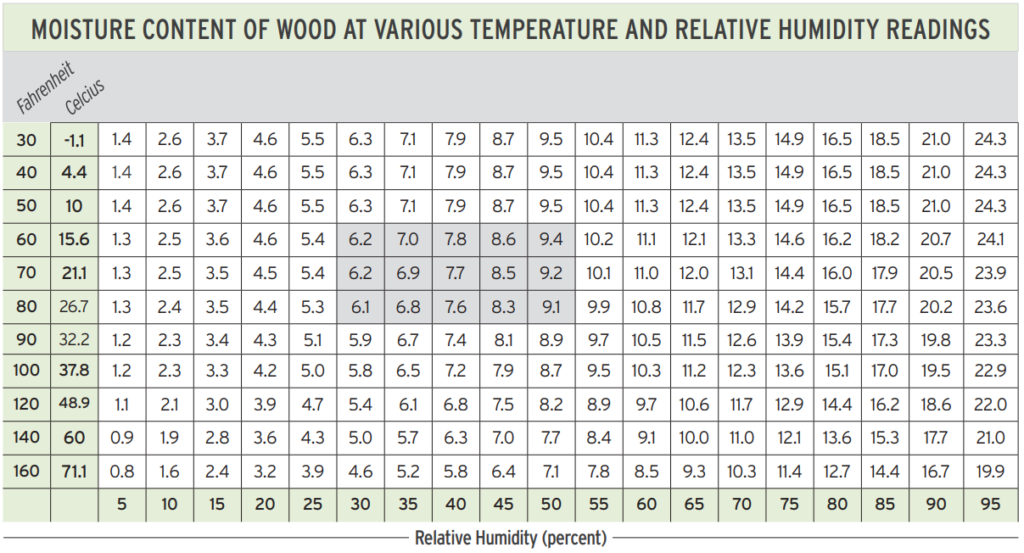
This above graph is telling us that if we keep the temperature at 70 degrees and 40% RH, the EMC of that flooring, if kept in that environment, will eventually become 7.7%. If you are trying to install a floor that is going to be kept in these conditions, you will want to make sure you are getting multiple readings throughout the flooring to measure as close to 7.7% as possible before starting your installation. If you are not getting these readings, more time is needed for acclimation.

So now the flooring is at the correct EMC for the environment you are placing the flooring. Installation has been done and if it was unfinished, it has been sanded and finished. You have completed the job and are about to be paid for your work. This is the time that could be the most critical part of the long-term floor care. Advising your customer on how to best maintain their new floor AFTER the installation.

As explained in previous episodes and info bulletins; their new floor needs to be maintained at 60° and 80° and 30% to 50% relative humidity (or whatever is suggested by the flooring manufacturer). Along with the flooring manufacturers floor care guide, either one of these two bulletins can be left behind with the floor owner to explain their role in the long-term performance of their new flooring…

Info Bulletin #20Did You Know_Episode 6 – Long Term Hardwood Floor Care

Info Bulletin #60Did You Know_Episode 2 – Seasonal Gaps and Moisture Control

Understanding the relationship between moisture and wood allows us to better understand what to expect as we work with the flooring products and how they will perform in the environment we are planning on placing them. It is an undisputed fact that moisture (or lack of moisture), whether in the form of liquid, vapor, or bound water, will affect the performance of wood flooring, regardless of style, species, width, installation method, or construction. As professionals in this industry, it is our responsibility to mitigate the adverse effects of moisture on wood floors and to communicate to our customers how to properly maintain them.

Additional information can be acquired from the manufacturer’s technical department of the products used on your floor. The National Wood Floor Association (NWFA) can be an additional resource. They can be reached at 800-422-4556 or online at www.woodfloors.org.


Quick links to products related to this episode…

‘Did You Know’ Episode 8 – Engineered Wood Floors Have a Comfort Zone Too

Posted on

Episode 8 – Engineered Wood Floors Have a Comfort Zone Too.

Hardwood flooring is manufactured in many widths and cuts to provide a multitude of design opportunities per species of hardwood. One design element we are seeing become more popular is wood flooring that is 6” to 10” wide and is chosen for the beauty and presence it brings to a room.

In dryer parts of the country or in a market that can experience a dry heating season, a solid flooring in 6” to 10” width would make just about any installer cringe due to the potential movement that floor could go through. To minimize this movement, manufacturers have put their wider plank products onto an engineered platform and have sold them as a more stable option to its solid counterpart. In higher moisture conditions, that engineered flooring will perform better during seasonal changes by not adversely reacting to a higher moisture were a solid may show signs of cupping quickly.

For years, the industry has used an image like the one above, stating the use of solid flooring should only be used on or above grade. Whereas an engineered flooring can be used on all three grades. This is due to the engineered flooring having more dimensional stability to handle the potential of a slightly higher moisture level in a below grade situation.

To the left are the most common types of engineered flooring platforms. If correct living conditions are not maintained in the home, either too high or too low of humidity, the flooring can be stressed and you may start to see unsightly gaps, squeaks and pops as fasteners start to work free from the subfloor and in worst case scenarios, the plies of the engineered flooring starting to tear apart.


While an engineered floor may be able to withstand a slightly higher amount of moisture before showing signs of wood distortion (i.e., cupping or warping), in a dry environment the structure of an engineered plank will tend to hold together so well that by the time you start to see the signs, it may be too late.

Some of the platforms pictured above may handle a wider variance in humidity levels and the manufacturers who utilize the different platforms will have a range that their product performs best in. I have seen in most manufacturer’s guidelines that they require to maintain 35% to 55% humidity with a range of 60° – 80° temperature.

When an engineered plank is exposed to an extended period of dry conditions, the layers of the substrates are stressed, potentially causing irreparable damage to that plank. If held in this situation long enough, the layers can start to peel apart and may appear as ‘Dry Cupping’ as pictured below on the left. Internally, the plies are ripping apart and if examined once the plank has been removed, you will see the ‘Wood Shear’ where the plies have torn like the picture on the right.  

Dry Cupping
Wood Shear

This issue is commonly misdiagnosed as delamination. The NWFA defines delamination as “The separation of two layers/plies within a piece of engineered flooring due to the lack of an adhesive bond is typically identified as a clean separation at the glue-line.” This would be a complete, clean separation between the plies and not show torn sections as shown in the image above. A wood floor that is showing signs of dry cupping or wood shear will usually have moisture content readings that indicate that the flooring has been exposed to very low humidity conditions.

Dry Cupping and Wood Shear is not considered a manufacturer defect and is not covered by the warranty since the environmental conditions of the home were not maintained according to the manufacturer’s Maintenance and Warranty Guidelines. Here is the phrasing one engineered manufacturer has on their website regarding wood flooring and its reaction to environmental conditions:

“Wood is a product of nature. As a natural material, it will expand and contract as it gains and loses moisture. Some gaps between the boards during low-humidity seasons are normal and not considered a defect. Maintaining optimum humidity levels of 35% to 55% will minimize these occurrences. Allowing relative humidity levels to fall below 35% can result in structural damage to the floor such as large gaps, splits in the surface, distortion of the boards and structural failure”.

Maintaining these correct environmental conditions will keep these issues from happening. Start by adding a thermo-hygrometer to be able to monitor the humidity. If your current HVAC system cannot maintain these conditions, additional moisture control systems may be needed to help keep the temperature and humidity of the home within the manufacturer’s suggested environmental conditions to maintain their warranty.  

Additional information can be acquired from the manufacturer’s technical department of the products used on your floor. The National Wood Floor Association (NWFA) can be an additional resource. They can be reached at 800-422-4556 or online at www.woodfloors.org.

This article was also featured in the Hardwood Floors Magazine. Click here to see that article.

‘Did You Know’ Episode 2 – Seasonal Gaps and Moisture Control

Posted on

Episode 2 – Seasonal Gaps and Moisture Control.

Even though wood has been cut, dried and milled into flooring, it is still a hydroscopic material and can accept and release moisture. When doing so, it can expand and contract. In extreme high or low moisture conditions, a floor can start to go through unsightly and unexpected changes and in worst cases, cause irreparable damage. The graph below can provide a good understanding of this comfort level.

As you see in the information below, the Forest Products Laboratory states that the comfort level of wood is at 60° – 80° and 30% – 50% relative humidity. These levels have been adopted by the National Wood Flooring Association and most flooring manufacturers as the levels at which hardwood flooring products will perform best. With this understanding of where wood performs best; manufactures have set their warrantee programs to mirror these levels.

When flooring is exposed to extreme conditions, either high or low, it will start to expand (when wet) or shrink (when dry). At this point, the floor may start to show evidence of these extreme conditions. Keeping your floors outside of the above mentioned parameters for an extended amount of time may cause irreparable damage. In many cases, exposing wood flooring to levels outside of this zone will void the manufacture’s warrantee.

Here are a few things that can be done to help maintain the correct conditions in a home:

  • Have a way to monitor temperature and humidity in the home.
    • If the HVAC thermostat does not have the ability to read humidity, inexpensive tabletop units can be purchased at most big box stores.
  • If the levels start to go outside the zone; use a humidifier or dehumidifier to control the moisture levels.
    • Standard heating and air conditioning systems may not be effective at controlling humidity levels. Additional humidity controlling devices may be necessary.
  • Make sure humidity control devices are maintained and always working properly.

Additional information can be acquired from the manufacturer’s technical department of the products used on your floor. The National Wood Floor Association (NWFA) can be an additional resource. They can be reached at 800-422-4556 or online at www.woodfloors.org.